Tag: visual studio

How to download and merge commits from a remote branch on your local branch – 118

Today’s tip shows how to combine doing a Fetch and a Merge by using the Pull command.

Suppose you have some incoming commits that you’re ready to merge into your local branch. In this example, I’ve create a new file on master on GitHub and I want to bring that commit into my local master branch.

Instead of fetching to review the commits that are going to be applied, we’ll assume you’ve already looked at GitHub to see what will be merged in.

Pull incoming commits into local master branch

The result of the Pull command shows a message at the top of the Team Explorer.

Repository updated to commit ID

Viewing the history on the master branch shows the tip (the top of the branch) having the newly merged in commit from GitHub.

History for local master branch

This begs the question: Why use Fetch? Why not always do a Pull? I believe the answer is

    1. if you want to verify what commits have been downloaded
    2. if you want to know if you’ll run into any merge conflicts before doing the Pull (the merge portion of Pull). However, I’m not sure how you can know if you’re going to have any merge conflicts, if you haven’t first merged the commits somewhere. I guess you could manually review the changes. Perhaps someone reading this knows what I’m missing.

How to download changes from a remote branch (e.g. GitHub) into your local branch in Visual Studio – 117

In yesterday’s example, you saw how to create a local branch from a remote tracking branch. In today’s tip, you’ll download new changes from the server into your local branch.

Suppose you know there are changes on a GitHub repo (in today’s example) you want to download to your computer.

First, switch to the branch you want to pull down, e.g. `for-review` is the branch with the changes I want. You can go to Team Explorer – Sync pane and click Fetch under Incoming Commits (or at the top of the pane).

Fetch incoming commits from branch for-review

After fetching, the window will show the new commits that have been downloaded but not applied to my local branch. That’s why this says “Incoming Commits”. The remote tracking branch remotes/for-review has these two commits (downloaded somewhere – not sure exactly where) but they have not been merged into your local branch (because we only “Fetched” the incoming commits, but haven’t done anything with them yet.)

downloaded commits

Now suppose you are ready to do something with these “incoming commits”, i.e. get the into your local branch `for-review`. Remember, your local branch is a just branch of the remote tracking branch, so you need to merge these 2 commits from the remote tracking branch into your local branch.

merge from origin/for-review into for-review branch 

The only thing that should look differently is the from branch name “origin/for-review”.

Click Merge to merge in the two incoming commits from the remote branch.

Go to View history to see the resulting timeline.

for-review history shows the 2 incoming commits

Sync will show 0 incoming commits now that they have been merged.

Yep, I already know what you’re thinking. I’m breaking down the steps manually and there’s this thing call Pull. Stay tuned to tomorrow’s tip 🙂

How to create a local copy of a remote branch in Visual Studio – 116

Suppose you’ve cloned a project from a GitHub repo that contains multiple branches. By default, Git pulls down the main tracking branch (e.g. master in most cases). That’s why you see a local checked-out (bolded) master and a remotes/origin master branch.

For the other branches under remotes/origin, Git doesn’t automatically pull these down. The branches listed under remotes/origin are called “remote tracking branches”. I believe these are also referred to as “remote branches” but the “tracking” is implied. Can you have a remote branch that isn’t a remote tracking branch? I guess not. I guess even if you checked out a “remote tracking branch” without the tracking flag (or without the checkbox checked), you’d still have the original “remote tracking branch” alongside the local non-tracked branch.

Team Explorer - Branches showing remote tracking branches

You cannot check out these remote branches directly. I guess if you could, you’d be working directly on the server instead of your local machine, which wouldn’t make too much sense, and probably wouldn’t be possible since a bare git repo (aka the git server you’re checking out from) doesn’t have a concept of a working directory. No idea. Just thinking out loud here.

Suppose you want to checkout the `for-review` branch to do work. First you’d need to create a new branch. Note just like 13* we’re going the long way around, meaning we’re not going to choose the “checkout” command in the context menu. We’re going to manually create the local branch first, then checkout, to see the process.

First, right click on the remote branch, and select New Local Branch From on the context menu, just as if you were creating any other branch. The Create Branch window section will appear.

creating a local branch from a remote tracking branch

Note how Visual Studio auto-populates the name of the local branch as `for-review` You could change the local branch name. You could also do `private string @long`. I’m sure the `@long` is far worse.

Checking the Create Branch button creates the local `for review` branch. Because the default is the Checkout branch option checked, the `for-review` is bolded.
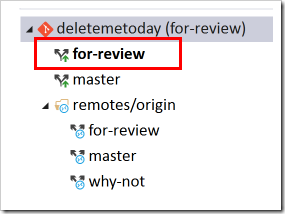
for-review local branch checked out

I believe the Checkout command on the context menu for a remote branch will perform the above steps, but I’m not sure if there are any differences. For example, I’d assume the checkout command keeps the defaults (e.g. Track remote branch and Checkout branch – of course). In any case, when I’m trying to learn something new, it is helpful for me to see what is going on step-by-step as much as possible.

If I have any of the above terminology wrong, please let me know!!

*Heaven Sent was one of the best Doctor Who episodes in a LONG time. Wow, just wow.

How to resolve a conflict during a rebase in Visual Studio – 115

Similar to yesterday’s tip, but today, you’ll see how to resolve a conflict when rebasing within Visual Studio.

Suppose you have the same line in the same file modified in different branches. Just something simple to trigger a merge conflict. Or more likely, you’ve added one file in master and you’ve added another file in an experiment branch. Then you get a conflict when rebasing because your project file needs help merging the two newly added files.

First, you’ll get the message that there are conflicts.

conflicts message in Team Explorer

Click on the Conflicts: 1 link.

resolve conflicts window in Team Explorer

Clicking on the Merge button will bring up the built-in merge tool.

Make whatever selections you want, and then hit Accept Merge.

Accept merge in VS tool

Now View Changes, as you’ve resolved the conflicts, but still need to finish the rebase.

resolve conflicts - view changes

And finally finish the rebase! (For some reason, I can’t stop hearing the Mortal Kombat game in my head.)

rebase in progress - continue

And now you’ll see that the experiment branch has been merged onto master.

experiment pointer above master pointer