Editing Items in ItemDetailsPage – Part 4 – Writing a Xamarin.Forms app

From the previous blog post, we now have these ListView items, we need to edit them. Persisting this data will be for an upcoming blog post. I’m trying hard not to blog dissertations. 🙂

To follow along, go to my ListViewInTabbedControl and  `git checkout tags/editing-fabrics` or view the diff.

What I learned

  • I do not need to use any TextChanged event because of data binding. I thought you might need to because the ObservableCollection wasn’t updating, but updating individual items is beyond the scope of what ObservableCollection can do. Because our Model.Fabrics derives from ObservableObject which implements INotifyPropertyChange, we’re all good to go! MVVM Frameworks FTW!

Add a Fabric property to the ItemDetailsViewModel

You’ll need a fabric object to create in ItemDetailsViewModel to bind to. In the ItemDetailsViewModel, create a public Fabric property

public Fabric Fabric { get; private set; }

and it in the ItemDetailsViewModel constructor, assign the incoming Fabric object to the Fabric property.

this.Fabric = Fabric;

And that’s it for the view model! Remember, you’re deriving from BaseViewModel, which derives from ObservableObject, which implements INotifyPropertyChange.

Add the textboxes to the View

In Page1.xaml, add the Label and Entry (Xamarin-speak for textbook)

<ContentPage.Content>
         <StackLayout>
                <StackLayout Spacing="10" Margin="10,30,0,0">
                    <Label Text="Name" FontAttributes="Bold" />
                    <Entry Text="{Binding Fabric.Name, Mode=TwoWay}"                            Keyboard="Text"                            Placeholder="Name of fabric">
                    </Entry>

                    <Label Text="Seconds" FontAttributes="Bold" />
                    <Entry Keyboard="Numeric"                             Text="{Binding Fabric.Seconds, Mode=TwoWay}"                             Placeholder="Number of seconds (e.g. 60)">
                    </Entry>
                </StackLayout>
            <Button x:Name="DoneButton" Text="Done" FontSize="Large" Command="{Binding DoneEditingCommand}" HorizontalOptions="Center" VerticalOptions="End"/>
        </StackLayout>
   </ContentPage.Content>

Now you’ll have an edit page for your fabrics

EditingFabric.png

and now your fabrics are edited!

FabricEdited.png

In the next post, I’ll talk about adding a new fabric to the list (including the messaging service). Stay tuned!

Displaying an ItemDetailsPage for a ListView item – Part 3 – Writing a Xamarin.Forms App

My adventures in “I can has MVVM” continues! Please see Part 1 (what this app is) and Part 2 (ListView).

If I’ve misunderstood something, please let me know! The only way to combat Impostor Syndrome is to fight it head on.

To follow along, go to my ListViewInTabbedControl and  `git checkout tags/ItemDetailsPage` or view creating the ItemDetailsPage here and view the adding the commanding diff here.

What I learned

  • There’s an excellent pluralsight course on async and await called Getting Started with Async Programming in .NET
  • Difference between PushAsync and PushModalAsync
  • Why do someFabric as Fabric instead of (Fabric) someItem as seen in this diff? If you use (Fabric), it’ll throw an exception immediately if cast fails, but if you do “as fabric”, it’ll just set to null so you can do things with it. You could always do a try catch if you use (Fabric), but it’s less code to write / cleaner

If you can eventually debug your issue, debugging is a great teacher! 🙂

While writing this post, I found a bug from Blog Post 1.

Originally I was going to refer to a scene from 13 Assassins (2011). Wait, hear me out 🙂 I was thinking of that scene towards the end of the movie where the guy gets hit and experiences pain for the first time, and the other guy says something like “well, that was unexpected.” For some reason, debugging this issue made me think of that scene /shrugs 🙂

When I tried to open the ItemDetailsPage, I got

NotUsingNavigationPage.png

Say the classic words with me, “But how is this working on my other app?” I know this code below should work to show the I​temDetailsPage

await this.Navigation.PushAsync(new ItemDetailsPage(tappedFabric));

So I tried to give it a NavigationPage…

await this.Navigation.PushAsync(new NavigationPage(new ItemDetailsPage(tappedFabric)))

and I got the same PushAsync is not supported globally on iOS, please use a NavigationPage exception. Grr.

Finally I realized which “Page” the exception was referring to. It’s not referring to the page I was trying to pass it. It’s referring to the page that’s the caller for this.Navigation.PushAsync 

What I mean is in App.xaml.cs, although I created navigation pages for these pages,

var page1Nav = new NavigationPage(page1);
var page2Nav = new NavigationPage(page2);

I neglected to add them to the tabbed control. Notice below I added page1 and page2 and not page1Nav and page2Nav, hence the exception.

var tabbed = new TabbedPage();
tabbed.Children.Add(page1);  // whoops! not a navigation page
tabbed.Children.Add(page2);  // whoops! not a navigation page

Make sure to change these lines to

tabbed.Children.Add(page1Nav);
tabbed.Children.Add(page2Nav);

Okay now back to your originally scheduled blog post, already in progress…

1) User taps an item to be edited in its own page

We’ll use `ItemTapped=”Handle_ItemTapped”` here in the code behind, since there’s not a corresponding bindable property, as you see in SelectedItem.

But what does “not a bindable property” mean? You might be tempted to try “ItemTapped="{Binding ItemTapped}" but that won’t work. You’ll get

Specific Cast Not Valid complier error message

You’ll need to use a click event handler in the code behind for item tapped. Why not just use ItemSelected? Well, the issue is when the user wants to edit the same item twice in a row. For example, say the user edits Fabric 1. Upon returning, this item will still be selected. Although it’s in an “inactive selection” state, you can’t select it again, meaning the user will try to tap it, but nothing will happen. The app will still just look at you. Hence for this UX design requirement, you need to use ItemTapped. And IMO, “tapped” is more descriptive of the action the user is performing than “selecting”.

Add the following code to Page1.xaml

ItemTapped="{Binding ItemTapped}

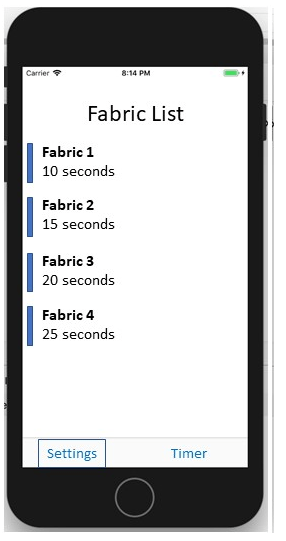
The ListView now gets its content from the ObservableCollection of Fabrics. I called this OCFabrics to break my reliance on it for all the app’s needs.

And in the codebehind for Page1.xaml.cs, add the following:

async void Handle_ItemTapped(object sender, Xamarin.Forms.ItemTappedEventArgs e){
   Fabric tappedFabric = e.Item as Fabric;

   if (tappedFabric == null)
       return;

   await this.Navigation.PushModalAsync(new ItemDetailsPage(tappedFabric));

I’ll go over the significance of PushAsync vs PushModalAsync at the bottom of this post.

2) Create the ItemDetailsPage() – what the user will see when he/she taps on an item

Add a new View called `ItemDetailsPage` under Views. (This is a Forms – ContentPage Xaml in VS for Mac). And a code behind called ItemDetailsViewModel.

Use the following code for the ItemDetailsPage

<ContentPage xmlns="http://xamarin.com/schemas/2014/forms"
xmlns:x="http://schemas.microsoft.com/winfx/2009/xaml"
x:Class="ListViewInTabbedControl.Views.ItemDetailsPage"
Title="{Binding Title}">
   <ContentPage.Content>
        <StackLayout>
            <Label Text="{Binding Title}"
VerticalOptions="CenterAndExpand"
HorizontalOptions="CenterAndExpand" />
        </StackLayout>
    </ContentPage.Content>

and for the codebehind

public ItemDetailsPage(Fabric fabric) {
  InitializeComponent();

  var itemDetailsViewModel = new ItemDetailsViewModel(this.Navigation, fabric);
  this.BindingContext = itemDetailsViewModel;
}

Run this and now you’ll get

displaying Fabric1 when tapped in its own page

awesome!

3) Now we need a way to escape by adding a Done button and a DoneEditing command.

In the ItemsDetailsViewModel, add a new property for the command

 public ICommand DoneEditingCommand { get; private set; }

in the ItemsDetailsViewModel constructor, create the new command, as shown below

public ItemDetailsViewModel(INavigation Navigation, Fabric fabric) {
            Title = "Hello from Item " + fabric.Name;
            this.Navigation = Navigation;
            DoneEditingCommand = new Command(DoneEditing);
}

where the `DoneEditing` is the delegate. Add the DoneEditing method in the ItemsDetailsViewModel class, e.g.

        private async void DoneEditing() {
            await Navigation.PopModalAsync();
        }

in the ItemDetailsPage, add a button to your StackLayout

<Button x:Name="DoneButton" Text="Done" FontSize="Large"
Command="{Binding DoneEditingCommand}"
HorizontalOptions="Center" VerticalOptions="End"/>

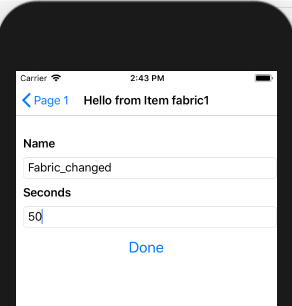
and voila! You can now hit done and skip around! The item tapped will be shown in the Details Page, e.g. Fabric3 will say “Hello from Fabric 3” with a Done button at the bottom.

Fabric 3 displayed in its ItemDetailPage

Why PushAsync instead of PushModalAsync?

It depends what you’re trying to achieve UX-wise. Do you want the ItemDetailsPage to slide in from the bottom or from the right? Do you want a “back” button in the header on iOS? Do you want a title?

Not sure? Let’s experiment!

The code above is sliding in from the bottom as a Modal pop-up. For sliding in from the right with a back button and a title, you’ll just do

In Handle_ItemTapped() do

await this.Navigation.PushAsync(new ItemDetailsPage(tappedFabric));

and have DoneEditing() to a corresponding

await Navigation.PopAsync();

both the `< Page 1` back button and the Done slide back.

HelloFromFabric1NonModal.jpg

MO this feels like a better UX.

BTW, that back button comes from using NavigationPages as the children of the Tabbed control, as mentioned at the top of my post

But let’s try out the PushModalAsync() to be certain which UX experience we want. Change both Handle_ItemTapped() and DoneEditing() to use Modal. Remember: if you push Modal you need to Pop Modal.

Notice how the Page appears from the bottom, but also no title or back button.

ItemDetailNoBackButton.jpg

next blog post will talk about editing the items.

Databinding a ListView – Part 2 – Writing a Xamarin.Forms App

Start here: Part 1 – Sara can has MVVM for what I’m building in this series.

Note: Matt Soucoup has been awesome helping me break my mental barrier to using services in a MVVM design pattern. Go check out his Xamarin blog. Consider my blog posts my homework assignments. The only way I truly grok a concept is when I can explain it to someone else.

To follow along, go to my ListViewInTabbedControl and  `git checkout tags/listview-created` or view the diff here.

What I learned

  • Do *NOT* use the ListView’s ObservableCollection as the “source of truth” for a list of fabrics. Forget about the ObservableCollection. It is only for the PageOneViewModel – this is the heart of the issue I have in my head. The source of truth for “What is my official list of Fabrics to iterate through on the other Tabbed page?” comes from a FabricDataService, which I’ll discuss later in this series.
  • Alt+Enter is the Ctrl+. for VS on Mac

1) Add a Fabric Model that derives from ObservableObject

ObservableObject is needed so that when the user edits items, the ListView will get those updates. For example,

    public class Fabric : ObservableObject
    {
        private string name;
        private int seconds;

        public Fabric(string Name, int Seconds)
        {
            this.Name = Name;
            this.Seconds = Seconds;
        }

        public string Name { get => name; set => SetProperty(ref name, value); }

        public int Seconds { get => seconds; set => SetProperty(ref seconds, value); }

        public override string ToString()
        {
            return this.Name + " " + this.Seconds;
        }
    }

2) In PageOneViewModel create an observable collection

For example,

public ObservableCollection OCFabrics { get; set; }

 Note to self: This ObservableCollection is *only* for the View to display items in the ListView. It’s “transient” to the ListView. Do *NOT* use this as the “source of truth” for fabrics, i.e. do not use as the official list of fabrics the rest of the app should use, e.g. which fabric are we on? what’s the seconds remaining for the current fabrics? This has been my biggest mental hurdle in MVVM.

If this isn’t the source of truth, what is? Enter a FabricDataService! More on this in my upcoming blog posts.

Let’s initialize this ObservableCollection with some data. we’ll change where this data comes from in a couple of blog posts using a FabricDataService. We just want a working list view for now.

public PageOneViewModel(INavigation Navigation) {

   OCFabrics = new ObservableCollection<Fabric>();

   OCFabrics.Add(new Fabric("fabric1", 5));
   OCFabrics.Add(new Fabric("fabric2", 5));
   OCFabrics.Add(new Fabric("fabric3", 5));

   Title = "Page One from VM";
   this.Navigation = Navigation;
}

3) In PageOneViewModel create a ListView.

Note the ItemsSource, SelectedItem, Binding Name, and Binding Seconds.

<ListView ItemsSource="{Binding OCFabrics}"
ItemTapped="Handle_ItemTapped"
SelectedItem="{Binding SelectedItem, Mode=OneWay}"
HasUnevenRows="True"
Margin="10,10,0,0">
                <ListView.ItemTemplate>
                    <DataTemplate>
                        <ViewCell Height="60">
                            <StackLayout Orientation="Horizontal">
                                <BoxView BackgroundColor="Blue" WidthRequest="10" Margin="0,0,0,10" />
                                <StackLayout BackgroundColor="White" Orientation="Vertical" Margin="5,5,10,5">
                                    <Label Text="{Binding Name}" FontAttributes="Bold" />
                                    <Label Text="{Binding Seconds, StringFormat='Seconds: {0}'}" TextColor="Gray" />
                                </StackLayout>
                            </StackLayout>
                        </ViewCell>
                    </DataTemplate>
                </ListView.ItemTemplate>
            </ListView>

And give it a run!

App showing the ListView populated with the items added to ObservableCollection

Yay! I can has ListView with data binding!

Let’s call it here for Part 2… Onward to Part 3 – Displaying Items in a ItemDetailsPage (coming soon!)

Sara can has MVVM – Part 1 – Writing a Xamarin.Forms App

I’m big into dev journaling. I don’t know why. I have OneNotes filled of “What did I learn today”, which are probably mostly wrong from random searches. I want to break out of this “Expert Beginner” mode. And the best way I can think of that right now is through transparency.

I have a couple of physical therapy iOS apps in the app store that I’m rewriting in Xamarin.Forms. I finished these over the summer, but I didn’t like the spaghetti code mess I inflicted upon myself. I’m taking this holiday break to re-re-design my app to fit a MVVM pattern. Part of me says “it’s better to have a working app in the app store than no app” and another part of me says “what will it take for me to grok non-spaghetti code concepts??” Those two parts have finally collided.

I’ve spoken with several people over the past 6 months to help me get over this MVVM conceptual hurdle, which you’ll read about in Part 2. To be clear, I get commanding and databinding. What I’ve always struggled with is how to get that data consumed by other parts of the app (e.g. a service, but how does a service work? Is it a static class? Is it a singleton? etc.)

Huge shout out and thank you to Matt Soucoup for being my human StackOverflow! Matt and I have been recording code review sessions together where I get to ask all of my n00b questions “Why are you using a NavigationPage and not just a regular ContentPage?”,  “Oh is that what that xmlns stands for!” and “I didn’t realize databinding took care of that automatically!” If you’re doing Xamarin work, stop reading my blog and go check out his at https://codemilltech.com/

Aside: Writing code is similar to writing an essay. There are so many different ways to express one’s thoughts. So many different ways to solve logic problems. So many different ways to code. Always fascinating to what someone else write code.

What I’m building

I’m rewriting “OnMyNerves” (a nerve desensitization therapy timer app – it’s really just a glorified timer). The user enters several Fabrics (that are used to desensitize the nerve) into a ListView. The user enters the Name and Seconds for each fabric. These fabrics are persisted on disk, so the user enters their “daily workout plan” only once.

This Fabric ListView is found under the Settings tab.

Mockup Showing list of fabrics

After the user populates the Settings, the user taps on the Timer page. When the user hits play, the timer starts for that fabric. In the screenshot below, Fabric 1 has 7 seconds remaining.

Mockup showing current Fabric timer progress

And the end, an alarm plays along with a couple of message boxes for user prompts (trust me the UX will make sense when we get there).

After the user dismisses the 2 message boxes, the timer goes onto the next fabric. When the timer has gone through all fabrics in the list, the sessions is saved (this is new in this Xamarin.Forms rewrite).

Each section below contains a “What I learned” retrospective.

  1. Creating a two page Tabbed control
  2. Writing up a ViewModel for Xamarin.Forms pages
  3. Adding XAML Compiling

To follow along for this blog post, check out all the tags (no pun intended) using git tag at   https://github.com/saraford/ListViewInsideTabbedControl

1 – Creating a two page Tabbed control

To see the completed code for this step:

​​​​​​git checkout tags/two-page-tabbed-control

Let’s start with the App()  constructor.

public App()  {

            InitializeComponent();

            var page1 = new Page1() {
                // needed to give the tabbed page a name
                Title = "Page 1"
            };
            var page1Nav = new NavigationPage(page1);

            var page2 = new Page2() {

                // needed to give the tabbed page a name
                Title = "Page 2"
            };
            var page2Nav = new NavigationPage(page2);

            // look! no corresponding .xaml file
            var tabbed = new TabbedPage();
            tabbed.Children.Add(page1);
            tabbed.Children.Add(page2);
            MainPage = tabbed;
}

This code will produce the following app:

Initial 2 pages in a Tabbed control non-MVVM

What did I learn?

  • If you look in the solution, you’ll discover that I’ve deleted the ListViewInsideTabbedDocumentPage.xaml file. Turns out you don’t need a “physical” .xaml file to go along with your tabbed page. I was surprised by this, asking, “But if I get rid of the .xaml file, that implies I’ll never have to make any XML changes?” Well, it turns out this is okay. The tabbed page really is a ‘holder’ of other pages, and doesn’t have a much of a UI other than the tabs. So in this case it is a lot easier to create the tabbed page all in C# rather than using XAML. You can just queue it up in a code behind. You can do more UX stuff with C# than you can do in XAML, but you’d really have to be getting into it at that point.
  • I also learned that you can have interactive tabs that don’t have text or images! So if you’re wondering, “why aren’t my tabs showing up?” They might be, even if you didn’t specify a Title or Image. Just look closely or tap 🙂
  • You’ll read about NavigationPage vs just new’ing up a ContentPage tomorrow

2 – Wiring up the ViewModel for our Xamarin.Forms pages

To see the completed code for this step:

git checkout tags/viewmodel-created

I remember someone telling me years ago that you always want to use a MVVM framework. This section explains why using a MVVM framework helps prevent you from rewriting code. BTW I’m the *worst* when it comes to this…I rewrite things, crazy things, all the time because I never stop first to check if there’s something I could reuse.

Step 1 – install Refactored.MvvmHelpers by James Montemagno. Install this in your PCL.

nuget installing Refactored.MvvmHelpers

This MvvmHelpers library gets you a couple of useful things

  • ObservableObject – you’ll see this more when we start to work on the ListView, but you know how you have to implement INotifyPropertyChange and use properties for databinding? That’s what this class does for you! No more hours wasted trying to debug “why isn’t my data refreshing?”

Looking at ObservableObject class

  • BaseViewModel – In a few minutes, you’ll have your ViewModels inherit from this class. BaseViewModel gives your ViewModels some common properties that will be used in practically all views, like Title and IsBusy. All you need to do is databind them. But what’s even better is that BaseViewModel also derives from ObservableObject, so again, you don’t have to redo INotifyPropertyChange in each of your ViewModels.

Step 2 – Next let’s refactor our solution

  • Move Page1.xaml and Page2.xaml into a new folder called Views. Next don’t forget to update the namespace from ListViewInTabbedDocument to ListViewInTabbedDocument.Views
    • This gets me every time “I moved the file but yet VS still knows where to find it!” So rename your namespace Every. time. sigh.
    • the namespace in the xaml, e.g.  x:Class=”ListViewInTabbedDocument.Views.Page1″>
  • Create a new folder call ViewModels. Add two classes, PageOneViewModel.cs and PageTwoViewModel.cs, creatively, into this ViewModels folder. (and please please please let Ready Play One movie be good!)

Step 3 – Have the PageOneViewModel look like the code below

Note the Navigation class in the constructor. You’ll pass this Navigation class in from the View so that the ViewModel will be able to call Push and Pop. More on that later.

Yes, I’m putting the View’s Navigation property into the view model… not exactly a pure separation of concerns. But this actually works out quite nicely! And it’s my next blog post (Part 2) that I’m desperately trying to grok, i.e. how the TimerPage gets the databinding’ed (databound? databinded?) data.

Also note the Title property being set. This comes from BaseViewModel.

using MvvmHelpers;
using Xamarin.Forms;

namespace ListViewInTabbedDocument.ViewModels {

    class PageOneViewModel : BaseViewModel  {

        private INavigation Navigation;

        public PageOneViewModel(INavigation Navigation) {

            Title = "Page One from VM";
            this.Navigation = Navigation;
        }
    }
}

Aside: my first CS prof told us never use the same variable name as in the parameter of a method or constructor as the class fields / properties. But this in the days of Turbo Pascal and I don’t recall if we had a `this` keyword back then.

Step 4 – Let’s have the Views create their ViewModels

The ViewModels will need to pass in the Navigation and setup the ViewModel as the binding context. So in the Views code behind…

public Page1 () {

   InitializeComponent();

   var pageOneViewModel = new PageOneViewModel(this.Navigation);
   this.BindingContext = pageOneViewModel;
}

Step 5 – Use databinding for the Title

Now to test we’re actually getting content from the ViewModel binding, update the Page1.xaml as follows

<ContentPage.Content>
        <StackLayout HorizontalOptions="CenterAndExpand" VerticalOptions="CenterAndExpand">
            <Label Text="{Binding Title}" />
        </StackLayout>
</ContentPage.Content>

And you’ll get the following. Notice the new text.

2 Pages using MVVM

Rinse and repeat for Page2.

The reason why I like doing things twice by having two pages (and yeah it’s a moot point since a tabbed control needs 2 or more) is that I can verify my blog posts by following my own directions for Page2.

What did I learn

  • First and more importantly, Alt+Enter in Visual Studio for Mac is the equivalent of Ctrl+. in Visual Studio.
  • I finally had a chance to ask all my embarrassing questions, including “When do you need to put the assembly name in the namespace? Is there something special about the name `local`? And what exactly is `xmlns`?   For example…”
<ContentPage
    xmlns="http://xamarin.com/schemas/2014/forms"
    xmlns:x="http://schemas.microsoft.com/winfx/2009/xaml"
    xmlns:ex="clr-namespace:OnMyNerves.Views;assembly=OnMyNerves"
    x:Class="OnMyNerves.Views.SettingsPage"

Here’s the breakdown…

  • `x:Class` is for the code behind
  •  “xmlns:x” which is the standard XAML namespace – which defines things like x:Name
  • “xmlns:local” is used when you’re going to use something in a different class somewhere that’s not in code behind. There’s nothing special re local. In this example, I’m using “xmlns:ex”.
    • Usually you’ll see both the `clr-namespace` and `assembly` defined
    • Wouldn’t need assembly if it is in the same an assembly, but if it is part of a 3rd party control, etc. you have to have it. Never hurts to be explicit.
  • “xmlns” – this stands for “XAML Namespace”, akak the base namespace. Means you can get everything that’s available in the Xamarin Forms namespace without any prefix, like StackLayout. Otherwise, prefixing these controls all over the place would get really old really fast.
  • “x.Name” – that’s part of the overall xaml namespace, which is different from the base namespace.

The more you know!

3 – XAML Compiling

To follow along:

git checkout tags/xaml-compiling

In App.xaml.cs, add the assembly attribute before the namespace.

using Xamarin.Forms;
using Xamarin.Forms.Xaml;

[assembly: XamlCompilation(XamlCompilationOptions.Compile)]
namespace ListViewInsideTabbedDocument {

What I learned

  • When it is on, in the final package XAML is complied down to IL. Otherwise, it would have to inflate and parse at runtime.
  • And XAML compiling does help during debugging … it will throw compile errors if you have any errors in your XAML (like typos) – that way you don’t have to wait until you actually load up the page at debug-time before it crashes on you.

Next blog post is about how to wire up a ListView instead the TabbedControl. Not sure why I called my project ListViewInsideTabbedDocument – that’s some old muscle memory from Visual Studio taking over my typing!