From the previous blog post, we now have these ListView items, we need to edit them. Persisting this data will be for an upcoming blog post. I’m trying hard not to blog dissertations. 🙂
To follow along, go to my ListViewInTabbedControl and `git checkout tags/editing-fabrics` or view the diff.
What I learned
- I do not need to use any TextChanged event because of data binding. I thought you might need to because the ObservableCollection wasn’t updating, but updating individual items is beyond the scope of what ObservableCollection can do. Because our Model.Fabrics derives from ObservableObject which implements INotifyPropertyChange, we’re all good to go! MVVM Frameworks FTW!
Add a Fabric property to the ItemDetailsViewModel
You’ll need a fabric object to create in ItemDetailsViewModel to bind to. In the ItemDetailsViewModel, create a public Fabric property
public Fabric Fabric { get; private set; }
and it in the ItemDetailsViewModel constructor, assign the incoming Fabric object to the Fabric property.
this.Fabric = Fabric;
And that’s it for the view model! Remember, you’re deriving from BaseViewModel, which derives from ObservableObject, which implements INotifyPropertyChange.
Add the textboxes to the View
In Page1.xaml, add the Label and Entry (Xamarin-speak for textbook)
<ContentPage.Content>
         <StackLayout>
                <StackLayout Spacing="10" Margin="10,30,0,0">
                    <Label Text="Name" FontAttributes="Bold" />
                    <Entry Text="{Binding Fabric.Name, Mode=TwoWay}"                            Keyboard="Text"                            Placeholder="Name of fabric">
                    </Entry>

                    <Label Text="Seconds" FontAttributes="Bold" />
                    <Entry Keyboard="Numeric"                             Text="{Binding Fabric.Seconds, Mode=TwoWay}"                             Placeholder="Number of seconds (e.g. 60)">
                    </Entry>
                </StackLayout>
            <Button x:Name="DoneButton" Text="Done" FontSize="Large" Command="{Binding DoneEditingCommand}" HorizontalOptions="Center" VerticalOptions="End"/>
        </StackLayout>
   </ContentPage.Content>
Now you’ll have an edit page for your fabrics
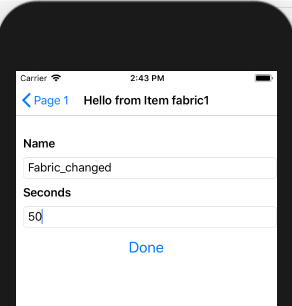
and now your fabrics are edited!

In the next post, I’ll talk about adding a new fabric to the list (including the messaging service). Stay tuned!

One thought on “Editing Items in ItemDetailsPage – Part 4 – Writing a Xamarin.Forms app”