This blog post walks you through creating and securing an ASP.NET Web API to work with B2C. You’ll call your new API from an existing B2C sample WPF application. I chose the WPF application example since this type of client app requires the fewest line changes to setup.
Note: The Azure Docs are securing a web API and calling a web API. This blog post is my “if I could go back in time, here’s what I would tell myself.”
When I first started learning Azure AD B2C, I thought it was adequate for 100 lv content that the samples to only contain a client application to obtain an id token. Perhaps this makes sense for the very first module in a B2C course. However, most apps want to do more than just authenticate and show your display name from the id_token. If you want to do more than just greet your users, your client app need to acquire an access token so it can put it to use, e.g. accessing some resource like an API.
btw: if you are only using an id token, I’d love to learn more about your scenarios!
Note you have to register your own APIs with B2C. You can’t use someone else’s API for demo purposes because the client ID and tenant name would be different. Trust me I went down this path several times before the “oh yeah – that’s right” moment finally hit home and stuck with me.
Demo code
The API in this sample returns a Hello <username> if the user is authorized.
The code sample that goes alongside this blog post is at https://github.com/saraford/HelloAPI-blog-post
Creating the Web API
- Open a new instance of Visual Studio. (In this example, I’m using Visual Studio 2017, but if there’s interest for 2015 steps, lmk!)
- Go to File – New – Project and choose Web – ASP.NET Web Application (.NET Framework)
- Choose Web API
- Name your project HelloAPI and click OK
- Leave authentication as No Authentication – otherwise, it installs Microsoft.Owin.Security.ActiveDirectory that uses the WindowsAzureActiveDirectoryBearerAuthentication middleware that doesn’t work with B2C tokens.
Create a route
Before we jump into authorizing our route, let’s make sure our API works properly.
- On the Controllers folder, right-click and select Add – Controller
- Select Web API 2 Controller – Empty and then click Add
- Name the controller HelloController
Next, we’ll add a new route
[Route("hello")]
[HttpGet]
public string Hello()
{
   return "Hello there!";
}
Now run your application. Add the `/hello` endpoint in your browser. You’ll be prompted to open a “hello.json” file.
For my setup, this file opens in VS Code and I see “Hello there!” returned.
Configure SSL
- Open the Properties Tool Window for the project, i.e. go to View – Properties Window (or press F4 on the project in solution explorer)
- Set SSL Enabled to true
- Copy the resulting SSL Link that appears below
- Go to the Properties page by right clicking on the project name in solution explorer and selecting Properties (or pressing Alt+Enter)
- On the Web side-bar tab, paste in the SSL link in the Project Url
- Click Create Virtual Directory – this step may be optional, I’m not sure.
Run your project and hit the /hello endpoint just to verify you are all set with SSL.
Now that the API is working properly, we can now move onto the next step: authorizing only those users with certain scopes in their access tokens to access the API.
Register the API in Azure AD B2C
Although you can register the API in the Azure portal at any time, I prefer to create the project first. It just keeps me grounded as to what I’m doing.
- Go to the Azure Portal – https://portal.azure.com/
- Make sure you are in the correct tenant you want to use.
- Register a new Web API
- Click Applications – Add.
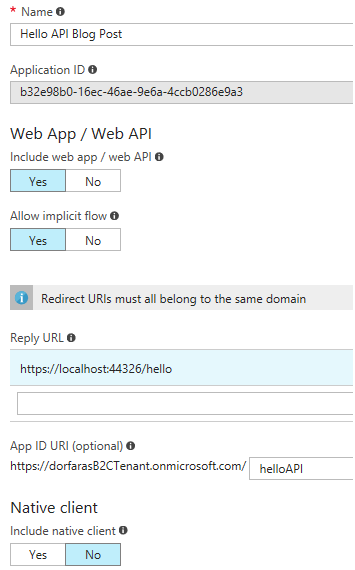
- Give it a reader-friendly name, like `Hello API for Demo`
- Click Yes for Web App / Web API
- For Reply URL, paste in the SSL URL you are now using from the Properties page (the Alt+Enter page) along with the endpoint e.g. `https://localhost:44326/hello`
- For App ID URI, provide a unique ID, e.g. `helloAPI` – this must be unique across all your B2C-registered applications in your tenant.
- Keep Native client as No.
- Click Create and wait a couple of seconds.
- Add scopes
- Click on your newly registered application in the portal, i.e. `Hello API for Demo`
- Click Published scopes
- Under Scope, give it the name `read` and a description `yet another read access`
If you have any issues following these steps, please check out my previous blog post.
Install the middleware
Back to Visual Studio!
The next steps are about setting up the middleware – aka the libraries for the Web API that talk to B2C, parse tokens, etc.
Note: OWIN is a specification, whereas “Katana” is the implementation of OWIN for .NET, but it seems a lot of people say “OWIN” to represent the implementation that is Katana.
You install all the necessary OWIN / Katana packages from the Package Manager Console. The blog post uses the nuget command line.
Note: if you decided to keep it all into one big solution, you’ll need to specify the project name (`Install-Package Microsoft.Owin.Security.OAuth -ProjectName HelloAPI`) or switch to that project in the nuget Package Manager Console dropdown. This got me a few times at first. I didn’t realize I was installing to the wrong project.
1. Run the command
Install-Package Microsoft.Owin.Security.Oauth
This will install at least the following dlls:
- Owin
- Microsoft.Owin
- Microsoft.Owin.Security
- Microsoft.Owin.Security.Oauth
- And possibly others
2. Run the command
Install-Package Microsoft.Owin.Security.Jwt
This will install “system.identitymodel.tokens.jwt” – this is a lower layer component that verifies tokens.
3. Run the command
Install-Package Microsoft.Owin.Host.SystemWeb
This loads the OWIN startup.cs into pipeline. Otherwise, you’ll get the dreaded “unauthorized” generic error message.
4. Run the command
Install-Package Microsoft.Owin.Security.OpenIdConnect
This is needed for the OpenIdConnectCachingSecurityTokenProvider class, which is needed for refreshing B2C tokens. You’ll add this class further below.
Add authorization code to the API
To the code!
Next, let’s setup the OWIN middleware.
1. The OWIN middleware needs to be configured at Startup. Otherwise, you’ll get the error:
[EntryPointNotFoundException: The following errors occurred while attempting to load the app.
 - No assembly found containing an OwinStartupAttribute.
 - No assembly found containing a Startup or [AssemblyName].Startup class.
This was a helpful article: OWIN Startup Class Detection
2. At the root project level in Solution Explorer, right-click and Add a new class. Choose OWIN Startup class. Rename the class to Startup.cs
3. Add the following code to the constructor:
// The OWIN middleware will invoke this method when the app starts
public void Configuration(IAppBuilder app)
{
  ConfigureAuth(app);
}
4. Change the class to partial
public partial class Startup
5. Go to the App_Start folder and add a new class called OpenIdConnectCachingSecurityTokenProvider.cs. Paste the code from an existing sample. Make sure to change the namespace to match yours. This class is needed to refresh B2C tokens.
6. In the App_Start folder and add a new class called `Startup.Auth.cs`
- Change this to partial. Why a partial class? It seems to be the design standard I’m seeing other samples use, but there’s no reason you can’t keep it all in the Startup.cs class (not that I’m aware of).
- Change the namespace from `HelloAPI.App_Start` to `HelloAPI` to match the Startup.cs class
- Add the following code into your Startup.Auth.cs class to configure the OWIN middleware (notice how this code uses your newly added OpenIdConnectCachingSecurityTokenProvider)
public partial class Startup
{
// These values are pulled from web.config
public static string AadInstance = ConfigurationManager.AppSettings["ida:AadInstance"];
public static string Tenant = ConfigurationManager.AppSettings["ida:Tenant"];
public static string ClientId = ConfigurationManager.AppSettings["ida:ClientId"];
public static string SignUpSignInPolicy = ConfigurationManager.AppSettings["ida:SignUpSignInPolicyId"];
public static string DefaultPolicy = SignUpSignInPolicy;
/*
* Configure the authorization OWIN middleware
*/
public void ConfigureAuth(IAppBuilder app)
{
TokenValidationParameters tvps = new TokenValidationParameters
{
// Accept only those tokens where the audience of the token is equal to the client ID of this app
ValidAudience = ClientId,
AuthenticationType = Startup.DefaultPolicy
};
app.UseOAuthBearerAuthentication(new OAuthBearerAuthenticationOptions
{
// This SecurityTokenProvider fetches the Azure AD B2C metadata &amp;amp;amp; signing keys from the OpenIDConnect metadata endpoint
AccessTokenFormat = new JwtFormat(tvps, new OpenIdConnectCachingSecurityTokenProvider(String.Format(AadInstance, Tenant, DefaultPolicy)))
});
}
}
Now ctrl+. All the things! Or simply just use these using statements in Startup.Auth.cs
using HelloAPI.App_Start;
using Microsoft.Owin.Security.Jwt;
using Microsoft.Owin.Security.OAuth;
using Owin;
using System;
using System.Configuration;
using System.IdentityModel.Tokens;
7. In Web.Config, add the following keys to your <appSettings>
<appSettings>
 <add key="ida:AadInstance" value="https://login.microsoftonline.com/{0}/v2.0/.well-known/openid-configuration?p={1}" />
<add key="ida:Tenant" value="dorfarasB2CTenant.onmicrosoft.com" />
<add key="ida:ClientId" value="b32e98b0-16ec-46ae-9e6a-4ccb0286e9a3" />
<add key="ida:SignUpSignInPolicyId" value="b2c_1_SiUpIn" />
Let’s pause here and make sure everything runs. We just want to make sure the OWIN middleware is configured properly to run at startup.
Add authorization verification to the route
1. In HelloController.cs, add the following constants at the top of the class
 // OWIN auth middleware constants
 public const string scopeElement = "http://schemas.microsoft.com/identity/claims/scope";
public const string objectIdElement = "http://schemas.microsoft.com/identity/claims/objectidentifier";
2. Secure your route by adding the [Authorize] attribute. I got this information from the ASP.NET Web API 2 attribute routing docs.
[Authorize]
[Route("hello")]
[HttpGet]
public string Hello()
3. Add the code to verify the access token contains the correct scopes. And if so, might as well display the name while we’re at it!
public string Hello()
{
   HasRequiredScopes("read");
   string name = ClaimsPrincipal.Current.FindFirst("name").Value;
   return "Hello there! " + name;
}
4. Add the HasRequiredScopes() method below the Hello() method – this is the method the B2C samples are using right now. YMMV.
// Validate to ensure the necessary scopes are present.
private void HasRequiredScopes(String permission)
{
  if (!ClaimsPrincipal.Current.FindFirst(scopeElement).Value.Contains(permission))
  {
     throw new HttpResponseException(new HttpResponseMessage
     {
       StatusCode = HttpStatusCode.Unauthorized,
       ReasonPhrase = $"The Scope claim does not contain the {permission} permission."
     });
  }
}
5. ctrl+. to add `using System.Security.Claims;` for the ClaimsPrincipal object
Let’s run your project to verify everything builds and launches. Don’t try to hit your endpoint yet. You are not authorized yet so it won’t work.
BTW: if someone knows a better way to test everything at this point, please let me know!
Update: Here’s a new blog post how to test your new API using Postman
Setting up the client to talk to your new API Endpoint
- Download or clone the B2C sample WPF project from https://github.com/Azure-Samples/active-directory-b2c-dotnet-desktop
- Register this in the Azure Portal (if you’ve already registered this from a previous sample, you can still use that registration)
- Make sure you are in the right tenant!
- Go to Application – Add
- Give your WPF app a friendly name, e.g. `Hello API WPF App`
- Click No for Web App / Web API
- Click Yes for Native client
- Give it a custom Redirect URI of `com.onmicrosoft.<your-tenant-name>.desktopapp://redirect/path`
- Click Create
- Wait a couple of seconds and open your app
Hello API WPF Appregistration page - Click on API access (preview) then click Add
- Select your HelloAPI in the dropdown and make sure the `read` scope is selected
- Click OK
- In App.xaml.cs
- Update the Tenant name to use your tenant name
- Update the ClientId to match your Application ID you got from registering your app in the portal
- Update your policies to match the ones you’ve created from my previous blog posts.
- In App.xaml.cs update the ApiScopes and ApiEndpoint to use you API endpoint and your defined scope, e.g.
public static string[] ApiScopes = { "https://dorfarasB2CTenant.onmicrosoft.com/helloAPI/read" };
public static string ApiEndpoint = "https://localhost:44326/hello";
Note: I like to comment out the previous ApiScopes and ApiEndpoint, so in case I need to debug, it’s easy to switch back to a working version. Note: I like to comment out the previous ApiScopes and ApiEndpoint, so in case I need to debug, it’s easy to switch back to a working version.
5. Run the client app. (Sign out if applicable) and sign in. Now click Call API, and you should see “Hello there! <Display name!>”
Reference
Here’s my API Registration in case it helps you to debug.
Achievement unlocked: Since I’m historically a client developer, this is my first time blogging about creating an API!

great post, thanks Sara! I wonder if you can get the code to highlight? The code would be easier to read then…
LikeLiked by 1 person
Absolutely! Originally, my last sentence was “Next on my list is to figure out how to get C# syntax highlighting, since you know, it’s like 2017 and we’ve landed a rocket on a comet!” but I wanted to end my post on a happier note 🙂
LikeLiked by 1 person
What does “ida:” stand for? I see it in the samples but I don’t understand it’s purpose.
LikeLike
Thanks for the article. Are you planning on doing an Web API Core 2.0 one by any chance? Maybe it could be based on https://github.com/Azure-Samples/active-directory-b2c-dotnetcore-webapi
LikeLiked by 1 person
Yes! Exactly. One of the next blog posts I’m drafting is using a Web API Core 2.0.
LikeLike
Awesome!
LikeLike